GUIDES NOT INCLUDED
Keep calm and press the space bar
The Complete Beginner's Completely Incomplete Guide to Oxygen Not Included
GETTING STARTED WITH AUTOMATION
Contents:
AUTOMATION BASICS
Automation takes a little bit of getting used to but can be very useful, so it's worth getting the hang of. Let's start with the basic concept and how it can be used in-game.
Oversimplified, automation allows you to tell the game:
-
When [a thing] happens, I want [another thing] to happen.
Let's look at some examples.
A common first automation project in a new base is to control a coal generator. Here, we tell the game:
-
When [my battery is low on charge], I want [my coal generator to start running]
-
When [my battery is fully charged], I want [my coal generator to stop running]
There are various machines your dupes need to fill - like filling your coal generators with coal. Another use for automation (using Auto-Sweepers) is to say:
-
When [my coal generator is running low on coal], I want [to fill it up with coal]
You can also use automation to control what gases are allowed in your base:
-
When [the gas near this gas pump is not oxygen], I want [the gas pump to kick in and pump it away]
Exactly how you tell the game these things will vary depending on what you are automating. Some things are as easy to automate as just running an automation wire between two things (like a coal generator and a smart battery). Other automation projects require some additional bits and pieces, often some kind of sensor used to detect something in its surroundings.
There are lots of different kinds of sensors in the game. Sensors for temperature, gas type, liquid type, amount of germs, time of day (what part of the cycle it is), and on and on. These can all be used to send those "when [a thing] happens, I want..." commands.
There is some stuff you need to get sorted before you can get automating.
Automation prerequisites
-
You will need to unlock automation-related sensors (and other things) through research (found in various places in the research tree)
-
You will need refined metals to build automation-related stuff (early-game you can refine metal ore using the Rock Crusher)
-
Some automation buildings require a dupe to have certain skills to build them. These skills are found along the Operating skill tree. The final skill, Mechatronics Engineer, requires maxing out both Operating and Supplying.
That's enough background - let's get automating.

Basic Coal Generator automation. Using Automation Wire, the Coal Generators are connected to a Smart Battery. The Smart Battery tells the Coal Generators when to activate.
AUTOMATING YOUR COAL GENERATOR
The coal generator and power transformer are covered earlier in this guide. Here, we focus on automation.
Research required:
-
Sound Amplifiers (under Power)
-
Smart Home (under Computers)
-
Brute-Force Refinement (under Solid Material)
We will need refined metal. So let's turn some Copper Ore into Copper. To do that:
-
Build a Rock Crusher (under Refinement)

The Rock Crusher

The Smart Battery
The Rock Crusher generates a lot of heat, so keep it away from your plants. This can be a temporary placement - we just want to get some automation going. You can also put a Storage Bin (or several) nearby, set to Metal Ore - the raw materials you use to refine metal.
One option regarding where to put your Rock Crusher, useful if you don't want to add additional strain to your regular power wire network, is to put it next to your coal generator. (See the picture above for an example of this.) Then you can connect the Rock Crusher directly to your coal generator using Heavi-Watt Wire. This means there is one less machine drawing power along your regular wire. The downside to this convenience is that Heavi-Watt Wire has a significant negative decor value.
Once your Rock Crusher is built,
-
order up 5 Copper (Iron works fine, too - I'm just assuming you have more copper ore)
Remember, you can raise the priority on the rock crusher. To make using the rock crusher more important to some dupe, you can change dupe priorities.
-
Operating the rock crusher falls under the "Operating" Duplicant Priority errand type
Building the automation
Once we have our Copper we are ready to go. To automate our coal generator we will need to:
-
Replace our Jumbo Battery with a Smart Battery (under Power)
-
Connect our Smart Battery to our Coal Generator(s) using Automation Wire (under Automation)
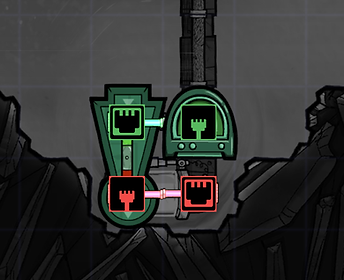
When you select Automation from the build menu (bottom left), it will open the Automation Overlay. This shows you where automation connection-points are.
You want to connect the smart battery and the coal generator with one continuous Automation Wire. (Do not connect the Power Transformer, Rock Crusher, or anything else.)
There is one more thing we need to do: tell our newly automated system what we want to have happen.
Telling the automation what to do
Thanks to the Automation Wire connecting your Smart Battery and your Coal Generator, your battery can now send messages - commands - to your coal generator.
Click on the Smart Battery and you will see something called "Logic Activation Parameters." They include a "High Threshold" and a "Low Threshold." Don't mind the wording - it's just a fancy-pants way of saying "stop" and "start."
The high and low thresholds have to do with how fully charged - or how close to empty - the Smart Battery needs to be before a command is sent to the coal generator.
-
The High Threshold is used to send a [Stop the coal generators - I'm sufficiently full!] command (also called a red signal)
-
The Low Threshold is used to send a [Fire up the coal generators - I need charging!] command (more formally known as a green signal)
You set the upper number to how full you want to have your battery charged before the coal generators stop. You set the lower number to how low you want the battery charge to go before the coal generators start charging it again.
The default values are 100 and 0. Letting the battery empty completely could cause problems, so raise the lower figure. I use the figures (which I stole from Francis John):
-
High threshold: 95
-
low threshold: 60
(The reason for 95 instead of 100 is that the coal generator automation takes a while to run. If it starts when you are at 99%, say, then you might waste a bit of coal.)
For now, this automation is useful to stop your coal generator(s) from running unnecessarily. Later in the game you will probably have several sources of power. Then you can use this same kind of automation to define in what order power sources are used. We'll go over that later in this section, but now let's look at another simple one: lighting.
AUTOMATING LIGHTING
Dupes will get a 15% speed buff ("Lit Workspace") if they work in a lit area.
Having lights on all the time will waste power and generate unnecessary heat. Using some simple automation - a Duplicant Motion Sensor (under Automation) connected to a light using automation wire - you can have the light only turn on when needed. (The sensor notices when there is a dupe nearby - you can see the radius when building the sensor.)
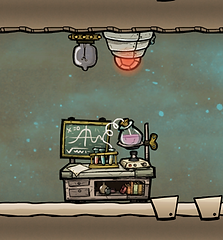

AUTOMATING GETTING RID OF (UNWANTED) HYDROGEN
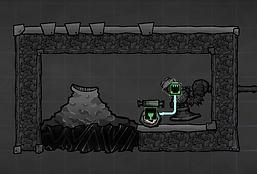
This simple setup, built at the top of a base, uses a Gas Element Sensor (set to Hydrogen) and a pump.
It won't get rid of all hydrogen - there will be some above the sensor, "on" the pump. But that little bit will be contained in the setup and not float around the base.


A note on gases: in Oxygen Not Included, gases tend to pool to the right. Hydrogen to the top right, carbon dioxide to the bottom right. So whenever building any systems to deal with excess gases, try to build them on the far right.
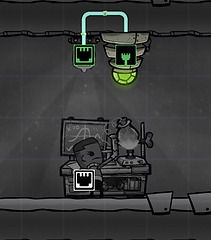
AUTOMATING GETTING RID OF [NOT OXYGEN]
Hydrogen will pool at the top of your base but plenty of other gases will pool at the bottom. You can build a similar setup for that, using a gas element sensor and a not gate.
Set the gas element sensor to oxygen. Connect it to a not gate, and then to a gas pump. The sensor will send a red signal if it isn't in oxygen. But on the way to the pump, the not gate will change the red signal to a green signal. That way the pump gets a green signal whenever the sensor isn't in oxygen.
AUTOMATING YOUR CARBON SKIMMER
This neat little carbon skimmer automation is from the Steam guide "Useful Construction Patterns" by Jahws.
Required research
-
Generic Sensors (in Computers)
-
Advanced Automation (also in Computers)
-
Improved Ventilation (in Gases)
Pictures of the build and its automation overlay, as well as the various sensor settings, can be found in the builds section of this website. I'll cover them here, too. But I'll start by going over what's involved and how it works.
(If you aren't that interested in how or why this contraption works, skip ahead to the actual building of the thing.)
The technical bit - what sensors we use and why
We have talked about automation as giving orders - like "Turn on the coal generator." What automation actually does is send a signal. The signal can be either red or green. Then it is up to us to work out what kind of a signal-sending contraption would, for instance, turn on a machine when we want it on.
In this design we will be using several new bits and pieces of automation. They will help us give very specific instructions to the carbon skimmer.
To help us get used to thinking in terms of automation, I will start talking more about red and green signals. (But it's still the same, rather straightforward stuff.) (So don't think it will suddenly get complicated and stop reading.)
We will use the following new automation thingies:

Gas Element Sensor
Gas Element Sensor
The Gas Element Sensor lets us use the gas surrounding the sensor (oxygen, carbon dioxide, etc.) in our automation commands. In our case:
-
If [there is carbon dioxide here], then [send a green signal]
We could just use the Gas Element Sensor and consider our automation complete. We could hook the sensor up to the Carbon Skimmer and (using a green signal for carbon dioxide) only allow the Carbon Skimmer to run when there is carbon dioxide around.
However, what if there are only tiny amounts of carbon dioxide? We don't necessarily want the carbon skimmer to use power if there's barely anything to skim. Enter: the Atmo Sensor.

Atmo Sensor
Atmo Sensor
The Atmo Sensor measure gas pressure. (Think: how much or little oxygen, carbon dioxide, etc. is there where the sensor is). It doesn't care what gas it is, just how much there is of it. Then the Atmo Sensor allows us to use that pressure reading in automation commands. In our case:
-
If [there is a decent amount of gas pressure here], then [send a green signal]
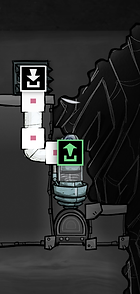
Now what if there is a tiny pocket of carbon dioxide rolling around on the ground by the carbon skimmer. It may have a decent gas pressure, but there's so little of it that we still wouldn't want to waste power getting rid of it. For this we can use the FILTER Gate.

Filter Gate
FILTER Gate
The FILTER Gate both receives and sends a signal. It is used to say:
-
If [I have received a green signal for (a certain length of time)], then [send a green signal]
We have one last piece to cover: the AND Gate.

AND Gate
AND Gate
The AND Gate lets us tell the carbon skimmer that we want it to run only if two things happen at the same time.
-
If [you get a green signal from A], do nothing
-
If [you get a green signal from B], do nothing
-
If [You get a green signal from A] AND [You get a green signal from B], then [send a green signal]
With all of these pieces to play with we can now - finally - build a thingamabob that tells the carbon skimmer:
-
IF there is carbon dioxide here (Atmo Sensor)
-
AND there has been carbon dioxide here for 5 seconds (FILTER Gate)
-
AND ALSO (AND Gate)
-
IF there is a decent amount of gas pressure here, regardless of what type of gas it is (Atmo Sensor)
-
AND there has been a decent amount of gas pressure here for 5 seconds (FILTER Gate)
-
THEN (AND Gate)
-
Turn on the carbon skimmer. (Yaaaaaay!)


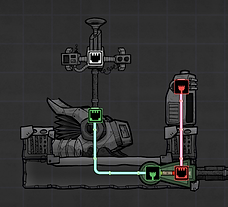
Carbon skimmer automation. A compact version and a spread out version to better see what the heck is going on. These pictures don't include liquids (water in, polluted water out). That is covered in the previous section of this guide, "The early game". The compact version of this automation fits in-between the carbon skimmer and water sieve covered there.
The actual building of the thing
This is easier to show with pictures (see above), but I'll give writing it out a try.
Using Automation Wire, connect the following:
-
The Carbon Skimmer to the AND Gate
-
NOTE: The connection to the AND Gate should be to an arrow pointing out from the AND Gate
-
-
The Atmo sensor to a FILTER Gate and that FILTER Gate to the AND Gate
-
NOTE: the arrows on the FILTER Gate should point from the Atmo sensor to the AND Gate
-
NOTE: The connection to the AND Gate should be to an arrow pointing in towards the AND Gate
-
-
The Gas Element Sensor to a different FILTER Gate and that FILTER Gate to the AND Gate
-
NOTE: the arrows on the FILTER Gate should point from the Gas Element Sensor to the AND Gate.
-
NOTE: The connection to the AND Gate should be to an arrow pointing in towards the AND Gate
-
The sensor settings
The final step is firing up the sensors. For them to work, we have to tell them what to do.
-
Set the Gas Element Sensor to Unbreathable Gas -> Carbon Dioxide
-
Set the Atmo Sensor to Above and 750 g (or thereabouts)
-
Set the FILTER Gates to 5 seconds (the default value)
You can use automation to make sure a pump only kicks in if there is a certain amount of gas or liquid in an area. This way you will conserve power by not having pumps running with pipes that are less than full.
For gases, use an Atmo Sensor. It detects how much gas is in the tile it is placed on. Then hook it up to your gas pump using automation wire. (I usually set it to above 500.)
AUTOMATING LIQUID AND GAS PUMPS TO SAVE POWER


For liquid pumps, you can accomplish the same thing with a Liquid Sensor. It detects how much liquid is in the tile it is placed on. Then hook it up to your liquid pump. (I usually set it to above 500.)

AUTO-SWEEPERS: AUTOMATING MOVING SOMETHING SOMEWHERE ELSE
Auto-Sweeper basics
-
The Auto-Sweeper is unlocked by researching Smart Storage (in the Solid Material research branch)
-
To build an Auto-Sweeper, a dupe needs to have the Mechatronics Engineer skill.
-
The Auto-Sweeper can pick things up and put them somewhere else.
-
That "somewhere else" needs to be a building, machine, etc - it can't just drop things on the ground.
-
You control Auto-Sweepers indirectly - they use building priority settings to decide what to do.
-
You do not need to connect an automation wire to the auto-sweeper for it to work.
You don't tell the Auto-Sweeper directly what to sweep up and where to put it. The Auto-Sweeper "looks around" and sees if there is
-
Somewhere to put stuff
-
Stuff to pick up that can be put there
If you have a Storage Bin set to coal, for instance, and an Auto-Sweeper nearby, then the auto-sweeper will see if there is any coal to pick up. If there are no other storage bins or buildings that require any other kinds of resources, then the Auto-Sweeper will only be interested in coal.
If you have two Storage Bins half-full of coal, and both Storage Bins have the same priority setting, the Auto-Sweeper does nothing. If, however, one of the Storage Bins is set to a higher priority than the other, then the Auto-Sweeper will start moving coal over from the lower priority bin to the higher priority one.
If an Auto-Sweeper isn't doing what you want it to do, the first step in debugging is looking at the priority settings in its surroundings. Whatever building (etc.) you want the Auto-Sweeper to move things to should be set to a higher priority than the storage bin (etc.) the thing is stored in. The second step in debugging is checking your automation overlay: is your auto-sweeper connected to an automation wire that might cause it to turn off?

Auto-Sweeper
SMART STORAGE BINS - STOP PRODUCING [X] WHEN FULL
You may want to always have a certain amount of something in stock. If you have less than that amount you want to manufacture more of it, and when you have enough you want to stop manufacturing it. You can automate this with with a Smart Storage Bin and a NOT gate.
-
Set the smart storage bin to whatever amount you want to keep in stock (the default setting is 20 000).
-
Using automation wire, connect the smart storage bin to a NOT gate, then connect the NOT gate to the machine you want to automate.
Now, when the smart storage bin is less than full it will send a green signal. When it is full it will send a red signal.
(I would recommend also adding an Auto-Sweeper to automate the filling of the smart storage bin.)

On some maps there will be plenty of rock but little or no sand. You can use a rock crusher to turn rock into sand. But micro-managing a rock crusher, and remembering to check sand levels, can be a bit tedious. You can use this same idea to automate the setup.
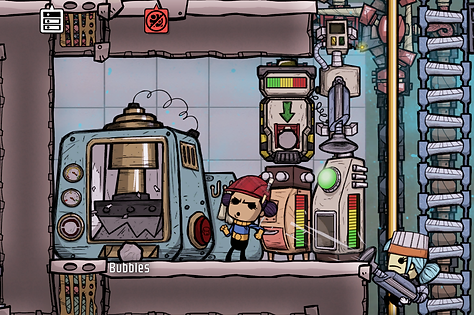
In the picture above, Pei is filling a storage bin with igneous rock (which there is plenty of on the map). Bubbles is using a rock crusher, which is set to always turn igneous rock to sand.
There is a smart storage bin that stores the resulting sand. The smart storage bin controls the rock crusher: it turns it on when the smart storage bin is less than full.


There is also some additional automation here: automating the sending of sand to all the machines that need it. This is done with a conveyor loader (The thing on top of the storage bin).
The conveyor loader is set to a higher priority than the smart storage bin, so it gets sand first. Conveyor rails then lead from the conveyor loader to conveyor receptacles that are placed by any machines that use sand.
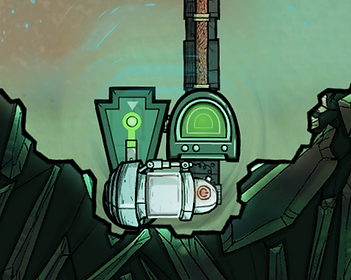
USING AUTOMATION TO PRIORITIZE POWER SOURCES
In Oxygen Not Included you have several possible power sources: coal, natural gas and solar to name a few.
If you have several power producers (coal generators, natural gas generators, solar panels) hooked up to your power network, you might not want all of them to run all the time.
Using automation, you can decide what power producer should be your primary source of power, which comes second, third and so forth. This is done using the same automation mechanic covered above (in Automating your coal generator).
All you need is a separate Smart Battery hooked up (using Automation Wire) to each different kind of power producer you have. One smart battery connected to all of your coal generators, one smart battery connected to all of your natural gas generators, and so forth.
NOTE: The Smart Battery needs to be connected to each individual power generator of that kind, not just one of them. So you would have Automation Wire connecting one Smart Battery with all of your Coal Generators.
All of the smart batteries should be connected to the same power grid. (You aren't limited to these batteries - your power grid can also include any number of additional batteries that aren't connected to any automation, whose only job is to store power.)
How it works
As the batteries are all connected to the same power grid, the level of charge - the amount of available power - will be the same in all batteries.
Because you have separate automation wires going to different groups of power producers, you can send different commands to each group . Specifically, you can tell each kind of power producer what level of battery charge you want them to start and stop running (meaning, charging the batteries) at.
Let's take an example where you have solar panels, natural gas generators and coal generators. In such a situation,
-
Solar panels wouldn't require any automation as you would probably want them to charge your batteries whenever possible.
If you want to run your base using only solar power whenever possible, you tell your other power producers to only kick in if they are needed.
-
Natural Gas Generators could be your second source of power. Set to be idle if the batteries are more than 50% charged. However, if the batteries drop to below 50% charge then the Natural Gas Generators kick in and start producing power.
-
Coal Generators could be your last resort. To avoid burning coal - and producing carbon dioxide - you could set your coal generators to only kick in if battery charge drops below 20%.
-
You can also set upper limits on categories. So if you wanted to minimize coal generator use, you could set it to turn off when the batteries are at, say, 30%.

Several sources of power. Different kinds of power production all hooked up to the same power grid. One smart battery per type of power generator, connected to all of that type using automation wire, allows you to decide when each separate category should kick in.
Previous
Home
Next