GUIDES NOT INCLUDED
Keep calm and press the space bar
The Complete Beginner's Completely Incomplete Guide to Oxygen Not Included
THE THERMO AQUATUNER & STEAM TURBINE COOLING LOOP
Introduction
The thermo aquatuner & steam turbine cooling loop is one of the most game-changing builds you will ever come across. It allows you to grab the end-game by its metaphorical horns and proclaim "I HAVE ARRIVED!," while laughing hysterically at the environment's attempts to overheat your base. (Or some toned-down version of that. To each their own.)
Having just sung its praises, I should add that this build was something I avoided for the longest time. I'm lazy, and the build seemed complicated. It was easier, when my base started getting too hot, or I started running out of water, to just point at something in my base that I thought I could do better if I started over.
Someone on Reddit used the term "restartitis." Which fits many of our playstyles perfectly - who doesn't love the promise of an untouched map? I'm not saying not to succumb to restartitis. I'm saying: once you take the time to learn how to build a cooling loop, restartitis becomes a choice rather than a necessity.
End-game here we come.
The thermo aquatuner

There are two machines involved: the thermo aquatuner and the steam turbine.
Thermo aquatuner basics:
-
Has a liquid input and a liquid output port
-
Requires (a lot of) electricity: 1,2kW
-
Liquid that passes through it will be chilled down by 14 degrees (Celcius)
-
Generates a lot of heat
The thermo aquatuner itself is uncomplicated: liquid goes in the machine, the machine cools it down and spits it back out.
The problem with this is that if we have a closed loop - our cooling liquid keeps going round and round, passing through the thermo aquatuner each time - then the cooling liquid will chill more and more until it freezes and starts breaking the pipes.

A closed loop (read: bad). This would eventually cause our cooling liquid to freeze and break our pipes.
So the challenge with the cooling loop is setting it up in such a way that our cooling liquid stays cool but doesn't freeze. Preferably allowing us to define a small window - a set temperature we want the cooling liquid to come out at.
This can be done in different ways. What we will use is the option of turning the thermo aquatuner on only when we need more chill. And letting the cooling liquid pass by the thermo aquatuner without going through it whenever we don't need more chill.
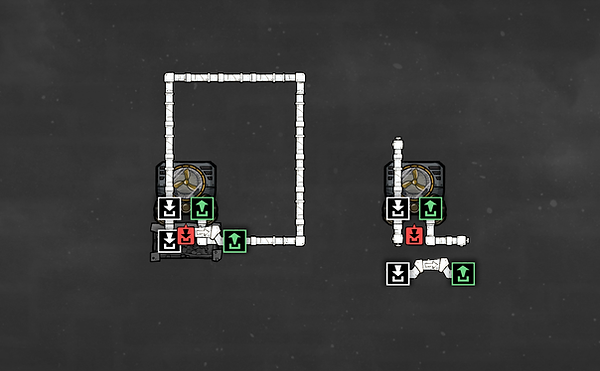
The solution (read: good). Cooling liquid can either go through the aquatuner or not, and still maintain the flow of the cooling loop.
This loop is such in design that packets (or blobs?) of cooling liquid can either go through the aquatuner or pass by without going through it.
If the thermo aquatuner is turned on, the cooling liquid enters the white input port and exits, cooled, out of the green port. If the aquatuner isn't turned on, the cooling liquid will just continue on past the white input port without going in the thermo aquatuner at all.
Now on to controlling the cooling in our loop. This we will do with some simple automation: a liquid pipe thermo sensor. Which we then connect to the thermo aquatuner using automation wire.

In the example above the sensor is placed just before the thermo aquatuner. This will lead to some fluctuations in temperature: our cooling liquid will come out 14 degrees colder when the thermo aquatuner is on than when it isn't.
Depending on what you are using the cooling loop to cool, that may not be a big deal, in which case you can use the design as-is.
If you want to even out the temperature of the liquid in your cooling loop, you can do that with some slight modifications to the design.
We add a liquid reservoir after the thermo aquatuner and move the liquid pipe thermo sensor to after the liquid reservoir.


In the example above the liquid reservoir would contain extra cooling liquid that will be used to even out the temperature of the cooling liquid before it sets out around the cooling loop.
If the liquid coming out of the liquid reservoir is too hot, the thermo aquatuner turns on. This sends colder cooling liquid into the liquid reservoir. The thermo aquatuner will keep adding chill to the liquid reservoir until the liquid in the reservoir has been chilled down to our target temperature.
In this design, we will only ever have big (-14C) fluctuations in temperature along the liquid pipe section going from the thermo aquatuner's output pipe to the liquid reservoir (when the thermo aquatuner turns on).
The liquid coming out of the reservoir and entering the cooling loop will maintain a steady temperature (as long as the thermo aquatuner can keep up with whatever you're trying to cool).
Speaking of cooling, let's move on to cooling the actual thermo aquatuner.
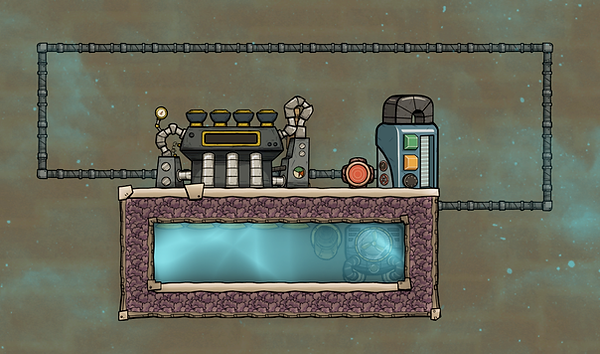
The idea is simple enough: we submerge it in a body of liquid. As the aquatuner heats up, the liquid absorbs part of that heat.


Almost there. Not seen in the pics is the automation wire connecting the aquatuner to the liquid pipe thermo sensor.
The problem with this design is that it only postpones the problem - eventually the water in the cooling tank will boil, turn to steam, and become too hot to be able to cool the thermo aquatuner. This is where the steam turbine comes in.
The steam turbine

Steam turbine
The steam turbine can turn heat into power, making it a powerful way to "get rid of" (some) heat.
Steam turbine basics:
-
Has input ports for steam (they only take in steam from under the machine - meaning you cannot pump steam directly into the turbine with gas pipes)
-
Has an output pipe for water
-
Produces power when active
The steam turbine takes in steam from the area at the bottom (you can see the five input ports at the bottom of the turbine). This steam powers the turbine, generating power. In the process, the steam cools down to very hot (95C) water and is fed out the liquid output pipe.
Some notes regarding the steam turbine:
-
The steam turbine only works with steam. So the cooling box for the aquatuner should not contain any oxygen or other gases, as they can interfere with the steam turbine by blocking its steam input ports.
-
The amount of water remains the same - no water is "lost" in the process. However much water (in the form of steam) it took in, it will spit back out.
-
If the steam turbine becomes too hot (above 100C) it will stop working.
-
The steam needs to be at least 125C for the steam turbine to kick in.
-
The steam turbine needs to have a power wire connected for it to work.

The steam turbine feeds its output water back into the cooling box to be reused.
The basic idea is simple enough: when the thermo aquatuner heats up our cooling liquid (in this case water) to the point where it boils and turns to steam, the steam turbine kicks in. (Specifically, when the steam is 125C or above.)
The steam turbine will cool down the steam, turning it into water that is just below boiling point (95C), and feed it out through the liquid output pipe.
We then pipe this water back into our "box" of cooling liquid, where it can once again be used to cool the thermo aquatuner.
That's about all there is to know. Now let's take a look at some overviews of a complete version.
Note: The output pipe doesn't have to have it's own tile, you can also put it below the steam turbine if you need a smaller cooling box. The same goes for the thermo aquatuner - it can be under the steam turbine. But this might diminish the steam turbine's cooling capacity (I haven't done any experiments with that).


Not included in the pictures above is a power overlay. The thermo aquatuner needs 1,2kW. The steam turbine will generate, not use, power. But for it to work it needs to have a power wire connected to it.
Some notes on building
My standard approach to building is to leave the water tank ends at two high during construction (see picture). This way dupes can run into the water tank to build.
Then I fill the water tank from only one side, to avoid getting air bubbles in the middle. If you ever do get an air bubble (or other gas), you can get rid of it by building a tile over it and then deleting the tile.
The filling can be done either with bottle emptiers or pumping water out through a liquid vent - whatever is most convenient.

To avoid getting gas pockets in your cooling tank, leave both ends open and fill it from one side.
I call it a "water tank," but it doesn't have to be all water. It just has to be a liquid that turns to steam when it boils. So polluted water is another option. You can also decrease the amount of liquid needed to fill the cooling box by having a layer each of two different liquids, like water and polluted water.
Note: Salt water is slightly risky to use. You can fit more salt water than water in a tile. If you fill your cooling box with (too much) salt water, you can end up with so much steam in the cooling box that the steam turbine output pipe stops working. (Which happens at over 1000 kg of steam).
It's important to make sure there are no air or other gas pockets in your water tank as that can mess with your steam turbine by blocking input pipes from being able to take in steam.
The thermo aquatuner needs to be able to withstand getting very hot. Which means you'll want to build it out of steel (or better).
As far as what liquid to use in the cooling loop, there are many choices. Which to choose depends on your needs, but if you just want to do a standard cooling loop that you will keep in a normal temperature range then you can use most any liquid, water or polluted water are common choices.
When choosing a liquid to use you can select a tile of liquid and check its properties: boiling & freezing points. This will show if a liquid is suitable for your needs.
You shouldn't fill the cooling loop and liquid reservoir completely as that can cause the loop to stop circulating. If the cooling liquid isn't moving, delete a section of pipe and rebuild it. (Or use the plumber skill to empty a pipe without deleting it.)
Previous
Home
Next